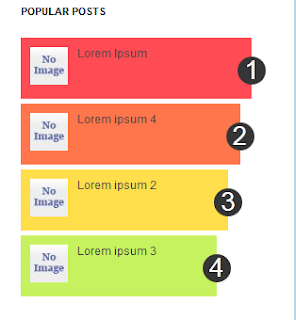
To customize this popular posts widget, we have to add a new variable and some CSS codes to our blogger template. So let's begin:
How to add multi-colored popular posts to Blogger
Step 1. Login to your Blogger Dashboard, go to Design >> Edit HTML
Step 2. Select "Expand Widget Templates" (make a backup first)
Step 3. Search for the following tag:
/* Variable definitions
====================
Note: If you can't find it, paste it below the autor information that is usually below this tag (CTRL + F):
<b:skin><![CDATA[/*
...and should end up with this symbol:
----------------------------------------------- */
Step 4. Copy and paste just below/after this tag, the next code:
<Group description="PopularPosts Backgrounds" selector="#PopularPosts1">
<Variable name="PopularPosts.background.color1" description="background color1" type="color" default="#fa4242" value="#ff4c54"/>
<Variable name="PopularPosts.background.color2" description="background color2" type="color" default="#ee6107" value="#ff764c"/>
<Variable name="PopularPosts.background.color3" description="background color3" type="color" default="#f0f" value="#ffde4c"/>
<Variable name="PopularPosts.background.color4" description="background color4" type="color" default="#ff0" value="#c7f25f"/>
<Variable name="PopularPosts.background.color5" description="background color5" type="color" default="#0ff" value="#33c9f7"/>
</Group>
Step 5. Search for the following piece of code:
]]></b:skin>
Step 6. Just above/before it, add this code:
#PopularPosts1 ul{margin:0;padding:5px 0;list-style-type:none}
#PopularPosts1 ul li{position:relative;margin:5px 0;border:0;padding:10px}
#PopularPosts1 ul li:first-child{background:$(PopularPosts.background.color1);width:90%}
#PopularPosts1 ul li:first-child:after{content:"1"}
#PopularPosts1 ul li:first-child + li{background:$(PopularPosts.background.color2);width:85%}
#PopularPosts1 ul li:first-child + li:after{content:"2"}
#PopularPosts1 ul li:first-child + li + li{background:$(PopularPosts.background.color3);width:80%}
#PopularPosts1 ul li:first-child + li + li:after{content:"3"}
#PopularPosts1 ul li:first-child + li + li + li{background:$(PopularPosts.background.color4);width:75%}
#PopularPosts1 ul li:first-child + li + li + li:after{content:"4"}
#PopularPosts1 ul li:first-child + li + li + li + li{background:$(PopularPosts.background.color5);width:70%}
#PopularPosts1 ul li:first-child + li + li + li + li:after{content:"5"}
#PopularPosts1 ul li:first-child:after,#PopularPosts1 ul li:first-child + li:after,#PopularPosts1 ul li:first-child + li + li:after,#PopularPosts1 ul li:first-child + li + li + li:after,#PopularPosts1 ul li:first-child + li + li + li + li:after{position:absolute;top:20px;right:-15px;border-radius:50%;background:#353535;width:30px;height:30px;line-height:1em;text-align:center;font-size:28px;color:#fff}
#PopularPosts1 ul li .item-thumbnail{float:left;border:0;margin-right:10px;background:transparent;padding:0;width:40px;height:40px}
#PopularPosts1 ul li a{font-size:12px;color:#444;text-decoration:none}
#PopularPosts1 ul li a:hover{color:#222;text-decoration:none}
Step 7. Now find the following code:
<b:widget id='PopularPosts1' locked='false' title='Popular Posts' type='PopularPosts'>
Step 8. Delete it until you reach at this tag (delete the </b:widget> also):
</b:widget>
Note: Be very careful when removing it. The entire fragment of code should look like this:
<b:widget id='PopularPosts1' locked='false' title='Popular Posts' type='PopularPosts'>
<b:includable id='main'>
<b:if cond='data:title'><h2><data:title/></h2></b:if>
<div class='widget-content popular-posts'>
<ul>
<b:loop values='data:posts' var='post'>
<li>
<b:if cond='data:showThumbnails == "false"'>
<b:if cond='data:showSnippets == "false"'>
<!-- (1) No snippet/thumbnail -->
<a expr:href='data:post.href'><data:post.title/></a>
<b:else/>
<!-- (2) Show only snippets -->
<div class='item-title'><a expr:href='data:post.href'><data:post.title/></a></div>
<div class='item-snippet'><data:post.snippet/></div>
</b:if>
<b:else/>
<b:if cond='data:showSnippets == "false"'>
<!-- (3) Show only thumbnails -->
<div class='item-thumbnail-only'>
<b:if cond='data:post.thumbnail'>
<div class='item-thumbnail'>
<a expr:href='data:post.href' target='_blank'>
<img alt='' border='0' expr:height='data:thumbnailSize' expr:src='data:post.thumbnail' expr:width='data:thumbnailSize'/>
</a>
</div>
</b:if>
<div class='item-title'><a expr:href='data:post.href'><data:post.title/></a></div>
</div>
<div style='clear: both;'/>
<b:else/>
<!-- (4) Show snippets and thumbnails -->
<div class='item-content'>
<b:if cond='data:post.thumbnail'>
<div class='item-thumbnail'>
<a expr:href='data:post.href' target='_blank'>
<img alt='' border='0' expr:height='data:thumbnailSize' expr:src='data:post.thumbnail' expr:width='data:thumbnailSize'/>
</a>
</div>
</b:if>
<div class='item-title'><a expr:href='data:post.href'><data:post.title/></a></div>
<div class='item-snippet'><data:post.snippet/></div>
</div>
<div style='clear: both;'/>
</b:if>
</b:if>
</li>
</b:loop>
</ul>
<b:include name='quickedit'/>
</div>
</b:includable>
</b:widget>
Step 9. After you have deleted the above code, paste the following in its place:
<b:widget id='PopularPosts1' locked='false' title='Popular Posts' type='PopularPosts'>
<b:includable id='main'>
<b:if cond='data:title'>
<h2><data:title/></h2>
</b:if>
<div class='widget-content popular-posts'>
<ul>
<b:loop values='data:posts' var='post'>
<li>
<b:if cond='data:showThumbnails == "false"'>
<b:if cond='data:showSnippets == "false"'>
<a expr:href='data:post.href' expr:title='data:post.title' rel='bookmark'><data:post.title/></a>
<b:else/>
<a expr:href='data:post.href' expr:title='data:post.snippet' rel='bookmark'><data:post.title/></a>
</b:if>
<b:else/>
<b:if cond='data:showSnippets == "false"'>
<b:if cond='data:post.thumbnail'>
<img class='item-thumbnail' expr:alt='data:post.title' expr:src='data:post.thumbnail'/>
<b:else/>
<img alt='no image' class='item-thumbnail' src='https://blogger.googleusercontent.com/img/b/R29vZ2xl/AVvXsEjIynTos4-iprEl-xLUiHbiXUMe6KwGO55MVPLqVt5f8wbL_kYQ7cBhv4d92XH1Vw6iCqAJaYNIM3_g7H7L0otaFnY5ZVjRA_HwHi20NmgbkKYduyGGuOmUE5pqYcOHxIxrbGHhvgzUZvQ/s1600/default.jpg'/>
</b:if>
<a expr:href='data:post.href' expr:title='data:post.title' rel='bookmark'><data:post.title/></a>
<div class='clear'/>
<b:else/>
<b:if cond='data:post.thumbnail'>
<img class='item-thumbnail' expr:alt='data:post.title' expr:src='data:post.thumbnail'/>
<b:else/>
<img alt='no image' class='item-thumbnail' src='https://blogger.googleusercontent.com/img/b/R29vZ2xl/AVvXsEjIynTos4-iprEl-xLUiHbiXUMe6KwGO55MVPLqVt5f8wbL_kYQ7cBhv4d92XH1Vw6iCqAJaYNIM3_g7H7L0otaFnY5ZVjRA_HwHi20NmgbkKYduyGGuOmUE5pqYcOHxIxrbGHhvgzUZvQ/s1600/default.jpg'/>
</b:if>
<a expr:href='data:post.href' expr:title='data:post.snippet' rel='bookmark'><data:post.title/></a>
<div class='clear'/>
</b:if>
</b:if>
</li>
</b:loop>
</ul>
</div>
</b:includable>
</b:widget>
Step 10. Save template.
Settings
- Go back to Layout and click on the edit link of Popular Posts widget.
Select to "display up to 5 posts", then Save the widget.
- You can easily change the background color of the popular posts widget, going to Template >> Customize >> Advanced >> PopularPostsBackground and there you can select any color you want.
You're done!
If you are enjoying reading this blog, please like & subscribe for more tutorials.
For any questions or suggestions, leave a comment below.
Transfer Car insurance quotes Colorado Insurance Loans mesothelioma attorneys california structured settlement buyer Treatment Data Recovery Services MOTORCYCLE ACCIDENT ATTORNEY LOS ANGLES Mortgage Tourism or Travel · PaperPort Promotional Code Donate car to charity California Donate Gas/Electricity Trading Donate Car for Tax Credit online making money Cord Blood Recovery Health Donate cars in ma Attormey iPage Credit Software Web Hosting and Domains ANNUITY SETTLEMENT Fatcow Insurance Blogs · World Trade Center Footage Technology Hosting domain registration yahoo Conference Call ACCIDENT AND INJURY ATTORNEY Lawyer Classes Claim Rehab SELLING A STRUCTURED SETTLEMENT ANNUITY donate old cars to charity structured settlement annuity companies Dreamhost · Mortgage Adviser Coupons Student Loans Degree hair removal washington dc Online casino Attomey Donate Car to Charity California Mesothelioma Law Firm Laws and lawyers AUTO ACCIDENT LAWYER DENVER STRUCTURED ANNUITY SETTLEMENT NUNAVUT CULTURE DAYTON FREIGHT LINES mesothelioma survival rates · Car Accident Lawyers structured settlements annuities mesothelioma suit


0 comentarios:
Publicar un comentario