lunes, 23 de diciembre de 2013

Popular Posts Widget for Christmas

The Christmas countdown has begun and while homes are decorated with colorful lights and the sweet smell of pine trees and the stores are playing Jingle Bells, there's no reason why we wouldn't decorate your Blogger blog with some ringing christmas bells right next to the Blogger Popular Posts widget!
So today I was playing around a bit with CSS and I was thinking that it would be nice to add some fresh styles to the Popular Posts widget so that it would look just ready for the forthcoming Christmas holiday.

popular posts widget, blogger gadgets

Demo: Click here to see how it looks like.

How to Add the Popular Posts Widget with Ringing Christmas Bells to Blogger


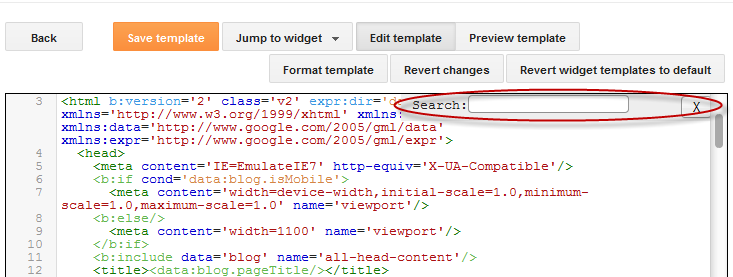
Step 1. Log in to your Blogger Dashboard, go to Template and click the Edit HTML button


Step 2. Click anywhere inside the code area and press the CTRL + F keys, then search for this tag:
</head>
Step 3. Just above the </head> tag, add the following:
<style>
#PopularPosts1 .item-thumbnail:before{
display: block;
content: url('https://blogger.googleusercontent.com/img/b/R29vZ2xl/AVvXsEiPpjbKT5sdqCxSfvYVPZDIPmIpPWZCOsWOT3p7_Q36K6Tbd9nyz_hQ5G0f3K9VPLs5JcBW55mzkTyrV79ksYPH2Esox1O6SLSuTfL1VD3E3ziCBEM4YRxx_TFgtUcXiUEo86GfikKU0H-3/s1600/bells.png');
margin-left: -15px;
margin-top: -5px;
z-index: 2;
position: absolute;
}
#PopularPosts1 .item-thumbnail img{
float:left;
margin:5px;
padding: 2px;
border: 6px solid #FED74C;
height: 72px;
width: 92px;
position: relative;
background: #F11C25;
-webkit-box-shadow: 2px 2px 5px rgba(0,0,0,0.3);
-moz-box-shadow: 2px 2px 5px rgba(0,0,0,0.3);
box-shadow: 2px 2px 5px rgba(0,0,0,0.3);
transition: opacity 1s ease;
}
#PopularPosts1 ul li:nth-child(odd){
  -ms-transform:rotate(20deg); /* IE 9 */
  -moz-transform:rotate(20deg); /* Firefox */
  -webkit-transform:rotate(20deg); /* Safari and Chrome */
  -o-transform:rotate(20deg); /* Opera */
 -webkit-transition: all 0.2s ease-in-out;
-moz-transition: all 0.2s ease-in-out;
-o-transition: all 0.2s ease-in-out;
transition: all 0.2s ease-in-out;
}
#PopularPosts1 ul li:nth-child(even){
  -ms-transform:rotate(-40deg); /* IE 9 */
  -moz-transform:rotate(-40deg); /* Firefox */
  -webkit-transform:rotate(-40deg); /* Safari and Chrome */
  -o-transform:rotate(-40deg); /* Opera */
 -webkit-transition: all 0.2s ease-in-out;
-moz-transition: all 0.2s ease-in-out;
-o-transition: all 0.2s ease-in-out;
transition: all 0.2s ease-in-out;
}
#PopularPosts1 ul li:nth-child(odd):hover{
  -ms-transform:rotate(0deg); /* IE 9 */
  -moz-transform:rotate(0deg); /* Firefox */
  -webkit-transform:rotate(0deg); /* Safari and Chrome */
  -o-transform:rotate(0deg); /* Opera */
}
#PopularPosts1 ul li:nth-child(even):hover{
  -ms-transform:rotate(0deg); /* IE 9 */
  -moz-transform:rotate(0deg); /* Firefox */
  -webkit-transform:rotate(0deg); /* Safari and Chrome */
  -o-transform:rotate(0deg); /* Opera */
}
#PopularPosts1 ul li{
display: inline-block;
float: left;}
#PopularPosts1 .item-thumbnail{
width: 70px;
}
#PopularPosts1 li{
margin-right: 15px;
}
#PopularPosts1 .item-snippet, .item-title{
display: none;
} </style>
<script src="http://helplogger.googlecode.com/svn/trunk/sounds.js"/>
Step 4. Now search for the following line (you'll find it twice but you should stop at the second one):
Note: if you don't want any ringing sound on mouseover, skip this step.
<a expr:href='data:post.href' target='_blank'>
And replace it with this:
<a onmouseover='mouseoversound.playclip()' expr:href='data:post.href' target='_blank'>
Step 5. Click on the Save Template button to save the changes.

And you're done! Enjoy :)
If you've missed it, here's a tutorial on how to add falling snowflakes in the background of a Blogger blog

Happy Holidays!
Share:

domingo, 22 de diciembre de 2013

How to Use Character Entities in CSS, HTML and JavaScript

Sometimes, when using scripts, we must write special characters like accents by using a special set of codes called character entities, however these don't always look good or we get a question mark or other strange symbols. Usually, this is solved if the character encoding is done right but the logic may not always work.

In Blogger, special characters most of the time appear correctly, but when it is about other services, like external files, things can get complicated.

For example, this usually looks good and when you click on this link, you should see the letters in the right way:
alert(" á é í ó ú  ☺ ✛ ❤ ");
If we are trying to use other method and we want to use this type of characters, sometimes we need to write them in a special format called escape sequence which is nothing but a backslash followed by a letter and a number in hexadecimal format. In the case of common characters or accents, it would be \x followed by two hex digits:
\xe1 is the letter á
\xe9 is the letter é
\xed is the letter í
\xf3 is the letter ó
\xfa is the letter ú
Other combinations generate special characters:
\n is a line break
\t is the tab character
\' is single quote
\" is double quote
\\ is a back slash
Or we can use \u followed by the Unicode character code expressed as four hexadecimal digits:
\u00e1 is the letter á
\u00e9 is the letter é
\u00ed is the letter í
\u00f3 is the letter ó
\u00fa is the letter ú
this will allow us to see correctly what we couldn't before if we were using some other services:
alert(" \u263a \u2764 \u271b ");
On this page you can find a comprehensive list of all the characters, both symbols and different alphabets.
Although rare characters are not often used in the CSS, there is a case when they are necessary as well, like when using the content property with the :after and :before pseudo-elements.

The same criteria applies there, but we only need to add a backslash followed by the four-digit hexadecimal code. For example:
content: ":\24d1\24d4\24d5\24de\24e1\24d4";

content: ":after  \263a  \2724  \2602";
:ⓑⓔⓕⓞⓡⓔ
:after ☺ ✤ ☂

Remember that IE doesn't understand the :before pseudoclass with content, and you would have to set the list-style-type property as none, or you would get 2 bullets in CSS compliant browsers.
Share:

sábado, 21 de diciembre de 2013

How to Create a Sitemap or Table of Contents in Blogger

One of the limitations of a blog is that it doesn't have an index or sitemap of the site that could make it easier for readers to find content that they are searching for.
While the blog archive and labels have all the information about the published post, these do not appear on a single page completely, so searching for more posts is not always easy.

Luckily, this gadget will help you to add a table of contents or sitemap on Blogger showing the index of all posts separated by categories that have been published. It will also show the latest posts with a text saying New!

table of contents, sitemap, blogger

Demo: You can see it working by clicking here.

How To Add a Sitemap with a List of Posts to Blogger


To implement it on your blog, follow the steps below:

Step 1. Login to your Blogger Dashboard and select your blog
Step 2. Go to Pages > click the New Page button and select Blank page


Step 3.  Click on the HTML tab and paste the following code inside the empty box:
<style>
p.labels a{color: #242424; text-transform: uppercase;font-size: 15px;}
a.post-titles {color: #0000FF;}
ol li{list-style-type:decimal;line-height:25px;}
</style>
<script>
//<![CDATA[
var postTitle=new Array();var postUrl=new Array();var postPublished=new Array();var postDate=new Array();var postLabels=new Array();var postRecent=new Array();var sortBy="titleasc";var tocLoaded=false;var numChars=250;var postFilter="";var numberfeed=0;function bloggersitemap(a){function b(){if("entry" in a.feed){var d=a.feed.entry.length;numberfeed=d;ii=0;for(var h=0;h<d;h++){var n=a.feed.entry[h];var e=n.title.$t;var m=n.published.$t.substring(0,10);var j;for(var g=0;g<n.link.length;g++){if(n.link[g].rel=="alternate"){j=n.link[g].href;break}}var o="";for(var g=0;g<n.link.length;g++){if(n.link[g].rel=="enclosure"){o=n.link[g].href;break}}var c="";if("category" in n){for(var g=0;g<n.category.length;g++){c=n.category[g].term;var f=c.lastIndexOf(";");if(f!=-1){c=c.substring(0,f)}postLabels[ii]=c;postTitle[ii]=e;postDate[ii]=m;postUrl[ii]=j;postPublished[ii]=o;if(h<10){postRecent[ii]=true}else{postRecent[ii]=false}ii=ii+1}}}}}b();sortBy="titleasc";sortPosts(sortBy);sortlabel();tocLoaded=true;displayToc2();document.write('</br><div class="sitemap-link"><a href="http://helplogger.blogspot.com/2013/12/add-sitemap-table-of-contents-to-blogger.html" style="font-size: 10px; text-decoration:none; color: #5146CD;">Get This Widget</a></div>')}function filterPosts(a){scroll(0,0);postFilter=a;displayToc(postFilter)}function allPosts(){sortlabel();postFilter="";displayToc(postFilter)}function sortPosts(d){function c(e,g){var f=postTitle[e];postTitle[e]=postTitle[g];postTitle[g]=f;var f=postDate[e];postDate[e]=postDate[g];postDate[g]=f;var f=postUrl[e];postUrl[e]=postUrl[g];postUrl[g]=f;var f=postLabels[e];postLabels[e]=postLabels[g];postLabels[g]=f;var f=postPublished[e];postPublished[e]=postPublished[g];postPublished[g]=f;var f=postRecent[e];postRecent[e]=postRecent[g];postRecent[g]=f}for(var b=0;b<postTitle.length-1;b++){for(var a=b+1;a<postTitle.length;a++){if(d=="titleasc"){if(postTitle[b]>postTitle[a]){c(b,a)}}if(d=="titledesc"){if(postTitle[b]<postTitle[a]){c(b,a)}}if(d=="dateoldest"){if(postDate[b]>postDate[a]){c(b,a)}}if(d=="datenewest"){if(postDate[b]<postDate[a]){c(b,a)}}if(d=="orderlabel"){if(postLabels[b]>postLabels[a]){c(b,a)}}}}}function sortlabel(){sortBy="orderlabel";sortPosts(sortBy);var a=0;var b=0;while(b<postTitle.length){temp1=postLabels[b];firsti=a;do{a=a+1}while(postLabels[a]==temp1);b=a;sortPosts2(firsti,a);if(b>postTitle.length){break}}}function sortPosts2(d,c){function e(f,h){var g=postTitle[f];postTitle[f]=postTitle[h];postTitle[h]=g;var g=postDate[f];postDate[f]=postDate[h];postDate[h]=g;var g=postUrl[f];postUrl[f]=postUrl[h];postUrl[h]=g;var g=postLabels[f];postLabels[f]=postLabels[h];postLabels[h]=g;var g=postPublished[f];postPublished[f]=postPublished[h];postPublished[h]=g;var g=postRecent[f];postRecent[f]=postRecent[h];postRecent[h]=g}for(var b=d;b<c-1;b++){for(var a=b+1;a<c;a++){if(postTitle[b]>postTitle[a]){e(b,a)}}}}function displayToc(a){var l=0;var h="";var e="Post Title";var m="Click to sort by title";var d="Date";var k="Click to sort by date";var c="Category";var j="";if(sortBy=="titleasc"){m+=" (descending)";k+=" (newest first)"}if(sortBy=="titledesc"){m+=" (ascending)";k+=" (newest first)"}if(sortBy=="dateoldest"){m+=" (ascending)";k+=" (newest first)"}if(sortBy=="datenewest"){m+=" (ascending)";k+=" (oldest first)"}if(postFilter!=""){j="Click to view all"}h+="<table>";h+="<tr>";h+='<td class="header1">';h+='<a href="javascript:toggleTitleSort();" title="'+m+'">'+e+"</a>";h+="</td>";h+='<td class="header2">';h+='<a href="javascript:toggleDateSort();" title="'+k+'">'+d+"</a>";h+="</td>";h+='<td class="header3">';h+='<a href="javascript:allPosts();" title="'+j+'">'+c+"</a>";h+="</td>";h+='<td class="header4">';h+="Read all";h+="</td>";h+="</tr>";for(var g=0;g<postTitle.length;g++){if(a==""){h+='<tr><td class="entry1"><a href="'+postUrl[g]+'">'+postTitle[g]+'</a></td><td class="entry2">'+postDate[g]+'</td><td class="entry3">'+postLabels[g]+'</td><td class="entry4"><a href="'+postPublished[g]+'">Read</a></td></tr>';l++}else{z=postLabels[g].lastIndexOf(a);if(z!=-1){h+='<tr><td class="entry1"><a href="'+postUrl[g]+'">'+postTitle[g]+'</a></td><td class="entry2">'+postDate[g]+'</td><td class="entry3">'+postLabels[g]+'</td><td class="entry4"><a href="'+postPublished[g]+'">Read</a></td></tr>';l++}}}h+="</table>";if(l==postTitle.length){var f='<span class="toc-note">Show All '+postTitle.length+" Posts<br/></span>"}else{var f='<span class="toc-note">Show '+l+" posts by category '";f+=postFilter+"' the "+postTitle.length+" Total Posts<br/></span>"}var b=document.getElementById("toc");b.innerHTML=f+h}function displayToc2(){var a=0;var b=0;while(b<postTitle.length){temp1=postLabels[b];document.write("<p/>");document.write('<p class="labels"><a href="/search/label/'+temp1+'">'+temp1+"</a></p><ol>");firsti=a;do{document.write("<li>");document.write('<a class="post-titles" href="'+postUrl[a]+'">'+postTitle[a]+"</a>");if(postRecent[a]==true){document.write(' - <strong><span style="color: rgb(255, 0, 0);">New!</span></strong>')}document.write("</li>");a=a+1}while(postLabels[a]==temp1);b=a;document.write("</ol>");sortPosts2(firsti,a);if(b>postTitle.length){break}}}function toggleTitleSort(){if(sortBy=="titleasc"){sortBy="titledesc"}else{sortBy="titleasc"}sortPosts(sortBy);displayToc(postFilter)}function toggleDateSort(){if(sortBy=="datenewest"){sortBy="dateoldest"}else{sortBy="datenewest"}sortPosts(sortBy);displayToc(postFilter)}function showToc(){if(tocLoaded){displayToc(postFilter);var a=document.getElementById("toclink")}else{alert("Just wait... TOC is loading")}}function hideToc(){var a=document.getElementById("toc");a.innerHTML="";var b=document.getElementById("toclink");b.innerHTML='<a href="#" onclick="scroll(0,0); showToc(); Effect.toggle(\'toc-result\',\'blind\');">?? Display Table of Contents</a> <img src="https://blogger.googleusercontent.com/img/b/R29vZ2xl/AVvXsEjLI4xbTsZFR0yf_FGXsTVDF-8YWnADGKt96jJ94E7iJh-LZn497c2-OkIUk6r7zJ6W0zvL9ghY3dbGuRFG0tW6Ddy4nC-VbcCgA24hWtDwOgJohzW7dSPnyRWgL_pOf4OOsG_qP5AEcLP6/s1600/new_icon.gif"/>'}function looptemp2(){for(var a=0;a<numberfeed;a++){document.write("<br>");document.write('Post Link : <a href="'+postUrl[a]+'">'+postTitle[a]+"</a><br>");document.write('Read all : <a href="'+postPublished[a]+'">'+postTitle[a]+"</a><br>");document.write("<br>")}};
//]]>
</script>
<script src="http://helplogger.blogspot.com/feeds/posts/default?max-results=9999&amp;alt=json-in-script&amp;callback=bloggersitemap"></script>
After adding the above code, replace http://helplogger.blogspot.com with the address of your blog.

Customization:

- to change the color and font size of categories title, replace the values in red
- to change the color of the links, replace the value in green

Step 4. Click Options on the right side and select Don't allow (hide existing) for the reader's comments

Step 5. Finally, click the Publish button and View the page.

That's all!
The index of the posts is sorted alphabetically and is updated automatically each time a new post is published.
Share:

jueves, 19 de diciembre de 2013

Using JQuery + EasyDrag to Move Elements or Images by Clicking on Them

This is one way to make your site more interactive so that readers can "play" with certain elements of the page being able to drag from one side to another within the container in which they are, i.e. can drag the images with a script that will allow them to move from one place to another within the blog.
Demo

You can see an example in this test blog

To create this effect on images


Login to your Blogger account, go to Template and click the Edit HTML button:


Click anywhere inside the template's code and press the CTRL + F keys to search for this tag:
</head>
Just before </head> paste the following scripts:
<script src='http://code.jquery.com/jquery-latest.js' type='text/javascript'/>
<script src='http://helplogger.googlecode.com/svn/trunk/jquery.easydrag.js' type='text/javascript'/>
Note: If you already have jquery, please remove the code in red.

Now when you want to drag an image, use this code inside the HTML of your post or of your page:
<img id="easydrag1" src="image-URL" style="border: 0px none; cursor: move;" />
<script type="text/javascript">
$(function(){ $("#easydrag1").easydrag();});
</script>
Change the URL of the image where is indicated, and furthermore, it is important that each image has a unique ID, in this example the ID is called easeydrag1, that ID must be twice.

If you have another picture with this effect, then you should put a different image with other ID, for example easydrag2, otherwise it will not work:
<img id="easydrag1" src="image-URL" style="border: 0px none; cursor: move;" />
<script type="text/javascript">
<img id="easydrag2" src="image-URL" style="border: 0px none; cursor: move;" />
<script type="text/javascript">
$(function(){ $("#easydrag1").easydrag();});
$(function(){ $("#easydrag2").easydrag();});
</script>
And how do you do if you want to put a link to the image?

We will set one Javascript function, so that when we will double click on it to open the page we want.

In this case, the code you would use, would be this:
<img id="easydrag1" style="cursor:move; border:0px;" ondblClick="javascript:window.open('link-URL')" src="image-URL" /><script type="text/javascript">
$(function(){ $("#easydrag1").easydrag();});
</script>
With this the picture can be without any problems dragged around and can be activated by double clicking on its link.
Share:

Filter out your visits to your blog from Google Analytics traffic statistics

The results of daily visits in the web hit counters always have a margin of error. In most of them, this margin is very high, therefore the statistics shown are not even a bit closer to the actual visits we have. Google Analytics has a very short margin of error, which makes it more reliable, so that we have a better idea of how many people visit us.

However, if you visit your own website, either to check if everything works well, to review comments, to answer them, to see if anyone is online, or just because you need to enter, then your visit will also be registered in the counter. This implies that the margin of error is larger again, because those visits are not our actual visits and we are not interested in knowing how many times we are coming back to our site, but how many people from elsewhere are visiting.
Therefore what we can do is to filter our IP so that we won't be registered in the statistics and thus to get "cleaner" results on the total number of visits and page views.
  1. The first thing is to find out what is your IP address. Just type "what is my ip address" on google and above all of the results it will say "Your public IP address is..." or you can use an online service that shows your IP. There are many of these sites, one of them being http://whatismyipaddress.com... just go to the site and it will automatically show your IP.
  2. Login to your Google Analytics account and click Admin in the orage bar on the right side. This will take you to the account administration screen 
  3. On the left is the Account section and below you'll find a tab called All Filters, just click the "+NEW FILTER" button.
  4. Give the filter any name you'd like. Filter Type is "Predefined filter", "Exclude", choose "traffic from the IP addresses" and "that are equal to" then enter your four numbered IP address you looked up in step 1.  Check whether it's IPv6 or not (if you don't know leave it unchecked).
  5. Save the changes.
Screenshot:

google analytics filters


You can add as many IP as you want, depending on how many different computers you use to access your site. And that's it. Now you can browse your site without registering a click in the Google Analytics metrics.
Share:

lunes, 16 de diciembre de 2013

How To Add Snow In The Background of Your Blog Using CSS

Today we’re going to go over a super simple CSS technique that you can use to make it snow on your Blogger blog. It seems particularly attractive since it doesn't require scripts, only CSS and three small images.

An advantage of this method is that by not using scripts doesn't overload the blog, the disadvantage is that users with not so modern browsers, will not be able to see it (in Internet Explorer works for version 10 and up).
The snow will fall in the background of the blog, which, in addition, prevent interfering with links or content (because the flakes are images), also prevent blocking the visibility of the content of the blog.

falling snow, snow, winter background, blogger

You can see the demo in this test blog.

How To Add Falling Snow To Blogger Blogspot


Step 1. Go to Template and click on the Edit HTML button:


Step 2. Click the small arrow on the left of <b:skin>...</b:skin> to expand the style (screenshot 1) and click anywhere inside the code area to search by using the CTRL + F keys for the ]]></b:skin> tag (screenshot 2)

Step 3. Add the following code just above it:
/* Snow falling for Blogger
----------------------------------------------- */
@keyframes snow {
0% {background-position: 0px 0px, 0px 0px, 0px 0px;}
100% {background-position: 500px 1000px, 400px 400px, 300px 300px;}
}

@-moz-keyframes snow {
0% {background-position: 0px 0px, 0px 0px, 0px 0px;}
100% {background-position: 500px 1000px, 400px 400px, 300px 300px;}
}

@-webkit-keyframes snow {
0% {background-position: 0px 0px, 0px 0px, 0px 0px;}
100% {background-position: 500px 1000px, 400px 400px, 300px 300px;}
}

@-ms-keyframes snow {
0% {background-position: 0px 0px, 0px 0px, 0px 0px;}
100% {background-position: 500px 1000px, 400px 400px, 300px 300px;}
}

#falling-snow {
background-image: url(https://blogger.googleusercontent.com/img/b/R29vZ2xl/AVvXsEi5Vx8DfrseS0B5sdGroMc23__dt9KyNDGHds96XiCvoLFrE9c5I6s8x_bAU1xD40auL8XPN-cFGi9SJ3nxYK4CFvW-n1t4pFdmvDjj9RHfwYPiYWVWRB1X5MXZBxgCEzJpn449pm-tXMlP/s1600/snow.png), url(https://blogger.googleusercontent.com/img/b/R29vZ2xl/AVvXsEiK4lz9lkvHQZtNeuuk8vti3Ra_C2srgczrn3Ajsgk25FNDvIB8eASLBcMQVJn94Ud6T3fBzKzyNzgTx2oH6eQh1NbB6pZQlkhpp6ikj8f9tP0lDH0iQeN-_OtRhPhs6ZPkVXJKaSB4mbZ4/s1600/snow3.png), url(https://blogger.googleusercontent.com/img/b/R29vZ2xl/AVvXsEiUq-maQXqpOgElOHv2Jgu90kZp2mfsmipW_WmWG0iXA1y7qRwAOuAoU9JU2lp5TMej-OLSd5qHgpCvQf81V_gSGfY4yJCSuwAWRB-eL05suXfMwtXrTX6UOFeuw8rG9-fQLA7H62iPF-J8/s1600/snow2.png);
-webkit-animation: snow 20s linear infinite;
-moz-animation: snow 20s linear infinite;
-ms-animation: snow 20s linear infinite;
animation: snow 20s linear infinite;
}
Screenshot 1: 


Screenshot 2:


Step 3. Now, search (CTRL + F) the <body> tag or if you can't find it, search this line below:
<body expr:class='&quot;loading&quot; + data:blog.mobileClass'>
Step 4. And just below, add this:
<div id='falling-snow'>
Step 5. Finally, find the </body> tag (CTRL + F) and add the following just above it:
</div>
Step 6. Save the changes and that's it. Enjoy!!! :)

As you can see this tricks is very simple and easy to install, does not block the visibility of blog's content and most important, it has no scripts, only CSS and nothing else.
Share:

martes, 19 de noviembre de 2013

Recent Rotating Post Gadget with Excerpt For Blogger

This Javascript code will display the latest posts of any feed with the distinction of having two parts that can be used individually or combined. At the top this widget will show a single post along with the title (link), author, date and a brief summary of its content. In addition, this post will rotate automatically within a list whose number of elements will be decided by us. At the bottom, we'll find a full list with chosen posts that will change the post above when we mouse over them, thus breaking the automatic cycle.
recent posts widget for blogger
Before installing anything, let's see it in action to decide if it does what we want.


Loading...

How to Add Recent Rotating Posts Widget to Blogger


Step 1. Go to Layout > click on Add a Gadget link.


Step 2. From the pop-up windows, choose the HTML/Javascript gadget


Step 3. Paste this code inside the empty box:
<style>
.gfg-root {
width: 100%;
height : auto;
position : relative;
overflow : hidden;
margin: 0 auto;
text-align : center;
font-size: 12px;
border: 1px solid #DBDBDB;
}
.gfg-title {
font-size: 16px;
font-weight : bold;
color : #6B6B6B;
background:#F3F3F3;
background-repeat: repeat;
line-height : 1.4em;
overflow : hidden;
white-space : nowrap;
padding: 5px;
text-shadow: 0px 2px #fff;
}
.gfg-entry {
background-color: #FFFFFF;
width : 100%;
height : 9.2em;
position : relative;
overflow : hidden;
text-align : left;
margin-top : 3px;
}
.gf-title a {
text-transform: capitalize;
color: #0000ff;
font-size: 14px;
}
.gfg-subtitle {
display: none;
}
.gfg-list {
position : relative;
overflow : hidden;
text-align : left;
}
.gfg-listentry {
line-height : 1.5em;
overflow : hidden;
white-space : nowrap;
text-overflow : ellipsis;
padding-left : 15px;
padding-right : 5px;
}
.gfg-listentry-odd {
background-color : #F3F3F3;
border-bottom : 1px dotted #CCCCCC;
padding: 5px;
}
.gfg-listentry-even {
background-color : #F3F3F3;
border-bottom : 1px dotted #CCCCCC;
padding: 5px;
}
.gfg-listentry-odd a{
color: #595959;
padding: 0 0px 0 10px;
}
.gfg-listentry-even a{
color: #242424;
padding: 0 0px 0 10px;
}
.gfg-listentry-highlight {
background: #FFFFFF;
}
.gfg-listentry-highlight:before {
position: absolute;
left: 0;
content: '\25BA ';
font-size: 14px;
color: #DBDBDB;
}
.gfg-listentry-highlight a {
color: #242424;
}
.gfg-root .gfg-entry .gf-result {
position : relative;
background-color: #ffffff;
width : auto;
height : 100%;
padding-left : 20px;
padding-right : 5px;
}
.gfg-root .gfg-entry .gf-result .gf-title {
font-size: 14px;
line-height : 1.2em;
overflow : hidden;
white-space : nowrap;
text-overflow : ellipsis;
margin-bottom : 2px;
margin-top: 5px;
}
.gfg-root .gfg-entry .gf-result .gf-snippet {
height : 3.8em;
color: #000000;
margin-top : 3px;
}
.clearFloat {
clear : both;}</style>
<script src="http://www.google.com/jsapi" type="text/javascript"></script><script src="http://www.google.com/uds/solutions/dynamicfeed/gfdynamicfeedcontrol.js" type="text/javascript"></script>
<script type="text/javascript">
function showGadget() {var feeds = [{title:'List',url:'http://helplogger.blogspot.com/feeds/posts/default?redirect=false&start-index=1&max-results=10'},];
new GFdynamicFeedControl(feeds, 'feedGadget',{title: 'Latest Posts', numResults : 10, displayTime : 5000, hoverTime : 500});} google.load("feeds", "1");
google.setOnLoadCallback(showGadget);
</script>
<div id="feedGadget">Loading...</div>

Customizations:

The url in blue is the feed address. Obviously, the http://helplogger.blogspot.com address should be replaced with yours.

Next is start-index=1. This number indicates which post will appear first on the list. By default it is the latest post published on our blog, so if we want to begin displaying older posts, we need to change the 1 value.

max-results=10 indicates the maximum number of posts that we will be reading from the feed, beginning from the one that we have set up before in the start-index=1. This number always needs to be equal or greater to what we should see later and its purpose is to set the number of posts that will be shown in the gadget. The easy thing would be to put 500 in order not to fail, but the higher the number is, the longer the gadget will take to load, so it's better to adjust to what we need to show.

Finally here are some other parameters of the script:

title: 'Latest Posts', is the widget's title that appears on top.
numResults: 10, number of posts that will show in the list
displayTime: 5000, the delay time between posts in the rotator (in milliseconds)
hoverTime: 500, minimum time for an item in the list to be displayed at the top.

If you want to hide the list and show only the posts, then change this part:
.gfg-list {
position : relative;
overflow : hidden;
text-align : left;
}
 to :
.gfg-list {
display:none;
}
and if you want to display only the list, then change this part:
.gfg-entry {
background-color: #FFFFFF;
width : 100%;
height : 9.2em;
position : relative;
overflow : hidden;
text-align : left;
margin-top : 3px;
}
to:
.gfg-entry {
display: none; }

Step 4. Save the gadget and you're done. Enjoy!
Share:

martes, 12 de noviembre de 2013

Scriptaculous image slider/carousel for Blogger

Image galleries, sliders and slideshows have become increasingly popular within web pages and more and more developers have been creating these amazing powerful, versatile and sleek galleries. In this tutorial, I will show you how to display the relevant content in an attractive and usable manner, by adding this beautiful carousel slideshow made by Brian R. Miedlar which will display a gallery of images with a cool sliding effect.
image slider for blogger

blogger widgets, blogger slider

If you need to see this carousel in action, please visit this demo blog.

How to Add the Scriptaculous Image Slider on Blogger


Step 1. Log in to your Blogger Dashboard and select your blog

Step 2. Go to Template and click the Edit HTML button:


Step 3. Click anywhere on the code area and press the CTRL + F keys, then search this tag:
</head>

Step 4. Just above the </head> tag, add this code:
<script src='http://www.google.com/jsapi'></script>
<script>
google.load("prototype","1.7.0.0");
google.load("scriptaculous", "1.9.0");
</script>


<script language='javascript' src='http://helplogger.googlecode.com/svn/trunk/Image Carousel/os.js' type='text/javascript'/>
<script language='javascript' src='http://helplogger.googlecode.com/svn/trunk/Image Carousel/carousel.js' type='text/javascript'/>
<script language='javascript' src='http://helplogger.googlecode.com/svn/trunk/Image Carousel/application.js' type='text/javascript'/>
Note: If you already have Scriptaculous and Prototype, it's not necessary adding the code in red.

Step 5. Now search for the following code (take a look at the screenshot for more details):
]]></b:skin>
image carousel, blogger image slider, blogger widgets
Screenshot
Step 6. Just above it, add the code below:
.carousel {
position:relative;
clear:both;
left:20px; /* Distance from left */
margin-top:10px;
margin-bottom:20px;
border:2px solid #000; /* Carousel border */
background-color:#333333; /* Background color */
}
.carousel .navButton { cursor:pointer; display:block;
text-indent:-9999px;
background-repeat:none;
z-index:10;
}
.carousel .container {
position:absolute;
overflow:hidden;
}
.carousel .items {
position:absolute;  }
#Carousel2 {
height:88px; /* height of the container */
width:685px; /* width of the container */
}
#Carousel2 .container {
left:26px;
top:12px;
width:630px; /* width of the images container */
height:100px; /* height of the images container */
}
#Carousel2 .items { top:0; left:2px;
width:1700px; /* overall width of all the thumbnails */
}
#Carousel2 .item { height:70px; width:70px; float:left; clear:right; }
#Carousel2 .item .icon img { position:relative; left:0px; width:65px !important; height:65px; cursor:pointer;}
#Carousel2 .navButton { position:absolute; bottom:0px; width:24px; height:87px; }
#Carousel2 .navButton.previous { left:0px; background-image:url(https://blogger.googleusercontent.com/img/b/R29vZ2xl/AVvXsEhPgnQ0IZiIiBFiFntZPQnZU09H4jqkUuSluXz1WJRPYjPxttUEoXEDhxIOYdRiY_fmYQF35u8J_cXWNbIpXYaNPTTwBUcQYGd9wrgFAIvXAo8DMPXSlsxqLfHnJyAcxPGGAurNBbSoIYA/s1600/button-left.png); }
#Carousel2 .navButton.next { right:2px; background-image:url(https://blogger.googleusercontent.com/img/b/R29vZ2xl/AVvXsEi9eIzPjl20G2cbOatm_BRvBcBVNjpP1-ZPu3scNDy2E67Fg0ocrL2LVi8M-IBOojqFusp77EZsDqQ6TuGj-a9Q7KBB-foXkdW7UUgwofAxwk_OcnjMVGzBnCBO6QOUNYR8F3y5YJVw3I0/s1600/button-right.png); }
#Carousel2 .item .key { display:none;}
#Carousel2 .item .picture { display:none;}
Here, I have put some styles in green that can be customized as you want , such as the border color and the background color. The arrows are images, so if you want to change their color or use other pics, you have to change the two URLs in blue.
The width of the carousel is of 685px, so below the header might look good. If you want to change the length, then you need to change the /* width of the container */ (which is the size of the entire carousel), the /* width of the images container*/ (which is the area that shows the thumbnails) and the /* overall width of the thumbnails */ which is the actual width that all the thumbnails occupy.

Step 7. In order to save the changes, click the Save Template button

Step 8. Finally, go to Layout and click the Add a Gadget link, then choose HTML/Javascript from the pop-up box and paste the structure of the carousel inside the empty box:
<div id="Carousel2" class="carousel">
<div class="button navButton previous" style="display:none;">Back</div>
<div class="button navButton next" style="display:none;">Forward</div>
<div class="container">
<div class="items">

<div class="item">
<div class="key caption">Thumb</div>
<div class="icon">
<a href="link URL"><img width="65" height="65" src="image URL" /></a></div>
<div class="picture"></div>
</div>

<div class="item">
<div class="key caption">Thumb</div>
<div class="icon">
<a href="link URL"><img width="65" height="65" src="image URL" /></a></div>
<div class="picture"></div>
</div>

<div class="item">
<div class="key caption">Thumb</div>
<div class="icon">
<a href="link URL"><img width="65" height="65" src="image URL" /></a></div>
<div class="picture"></div>
</div>

<div class="item">
<div class="key caption">Thumb</div>
<div class="icon">
<a href="link URL"><img width="65" height="65" src="image URL" /></a></div>
<div class="picture"></div>
</div>

<div class="item">
<div class="key caption">Thumb</div>
<div class="icon">
<a href="link URL"><img width="65" height="65" src="image URL" /></a></div>
<div class="picture"></div>
</div>

<div class="item">
<div class="key caption">Thumb</div>
<div class="icon">
<a href="link URL"><img width="65" height="65" src="image URL" /></a></div>
<div class="picture"></div>
</div>

<div class="item">
<div class="key caption">Thumb</div>
<div class="icon">
<a href="link URL"><img width="65" height="65" src="image URL" /></a></div>
<div class="picture"></div>
</div>

<div class="item">
<div class="key caption">Thumb</div>
<div class="icon">
<a href="link URL"><img width="65" height="65" src="image URL" /></a></div>
<div class="picture"></div>
</div>

<div class="item">
<div class="key caption">Thumb</div>
<div class="icon">
<a href="link URL"><img width="65" height="65" src="image URL" /></a></div>
<div class="picture"></div>
</div>

<div class="item">
<div class="key caption">Thumb</div>
<div class="icon">
<a href="link URL"><img width="65" height="65" src="image URL" /></a></div>
<div class="picture"></div>
</div>

<div class="item">
<div class="key caption">Thumb</div>
<div class="icon">
<a href="link URL"><img width="65" height="65" src="image URL" /></a></div>
<div class="picture"></div>
</div>

<div class="item">
<div class="key caption">Thumb</div>
<div class="icon">
<a href="link URL"><img width="65" height="65" src="image URL" /></a></div>
<div class="picture"></div>
</div>

<div class="item">
<div class="key caption">Thumb</div>
<div class="icon">
<a href="link URL"><img width="65" height="65" src="image URL" /></a></div>
<div class="picture"></div>
</div>

<div class="item">
<div class="key caption">Thumb</div>
<div class="icon">
<a href="link URL"><img width="65" height="65" src="image URL" /></a></div>
<div class="picture"></div>
</div>

<div class="item">
<div class="key caption">Thumb</div>
<div class="icon">
<a href="link URL"><img width="65" height="65" src="image URL" /></a></div>
<div class="picture"></div>
</div>

<div class="item">
<div class="key caption">Thumb</div>
<div class="icon">
<a href="link URL"><img width="65" height="65" src="image URL" /></a></div>
<div class="picture"></div>
</div>

<div class="item">
<div class="key caption">Thumb</div>
<div class="icon">
<a href="link URL"><img width="65" height="65" src="image URL" /></a></div>
<div class="picture"></div>
</div>

<div class="item">
<div class="key caption">Thumb</div>
<div class="icon">
<a href="link URL"><img width="65" height="65" src="image URL" /></a></div>
<div class="picture"></div>
</div>

<div class="item">
<div class="key caption">Thumb</div>
<div class="icon">
<a href="link URL"><img width="65" height="65" src="image URL" /></a></div>
<div class="picture"></div>
</div>

</div>
</div>
</div>
Add the links and images addresses. The link URL is optional, so you can add the addresses only when if you want to link the images to some posts.

If you add more images or remove some, you need also to change the width of the thumbnails, otherwise some pictures will appear behind the others.

If you want to add more pictures, just add before the </div> tag, a piece of code like this:
<div class="item">
<div class="key caption">Thumb</div>
<div class="icon">
<a href="link URL"><img width="65" height="65" src="image URL" /></a></div>
<div class="picture"></div>
</div>
And in case you want to align the gadget, just change the part from Distance from the left to another value.
Share:

sábado, 9 de noviembre de 2013

How to Write SEO Optimized Blog Posts

I'm not a SEO Expert, nor what you will read further is a top secret, but this is about the basic optimization that everyone should apply in order to write seo optimized blog posts. And with these techniques, effort, and a bit of patience, you can occupy the best places in the search results of different search engines.

Obviously, not all scenarios are the same, neither all blogs are positioned in the same manner, some might have greater competition than others depending on how popular is the topic that they handle; therefore, when it comes to web ranking, there's no specific time that applies for all. Having said this, let's get into the subject.

Focus on a topic

Whatever the topic of your blog is, when you try to write a seo optimized blog post, focus on a specific subject that has a clear purpose, with no distractions. For example, if you write about "Digital Cameras", then the beginning and ending of your post should be only about it. Don't start talking about digital cameras and end up telling about what you have done last weekend. A reader goes to a page because is looking for a specific information. So, unless it is not a personal blog (where you write about your daily life), do not deviate from the topic.

Define the post title

The post title should be short and to the point, so that you can briefly summarize the content of the post, but you shouldn't abuse this either. Although it has to be concise, don't try to 'save' words which might be keys to the search.

Examples:
Collection of all the cameras that have been released last year on the market
The best digital cameras of 2013
Clearly, the first one hasn't been defined very much, and the second one is not only more accurate, but it is also more relevant for what people are searching on the internet.

The keywords

Keywords are those terms that the most people are searching for on the internet and you should try focusing on them when writing a post; these keywords need to be included throughout the entire post, but be careful to not over-stuff keywords into your content.

Example:
During the fourth week of the technology, there were many products that are utilized today, and the most famous experts gave a speech on them.
At the opening of the fourth Technology Week, the experts talked about various topics, including how to choose a digital camera, had discussions about the pros and cons of the iPad, and which are the best smartphones.
In the first example, we have written without paying attention to any terms. While, in the second one, we used phrases that are searched on the internet by the most users.

So, the most popular keywords should be included wisely without cluttering your posts with them, or it can be counterproductive.

Again, these keywords should be included in the posts title, as well.

Rely on synonyms

While it's a good strategy to use specific keywords, we should not limit ourselves to a single word. It is recommended using synonyms because users do not name things in same way and using less keywords, we can avoid leaving the impression that we are being too repetitive and insistent.

Examples:
For those who like good quality pictures, Nikon D7000s Digital Camera is a 16.2 megapixel digital camera that takes great pictures.
For those who like good quality images, Nikon D7000s is a 16.2 megapixel digital camera that takes excellent pictures.
In the first example, we have repeated the word 'digital camera' and 'pictures' twice. While, in the second one, we used the digital camera keyword once and changed the word 'pictures' with 'images'.

This way, the reader will find a greater diversity of words and might enjoy the article more.

Using bold and italics

A good practice when you write seo optimized blog posts, would be to make the keywords bold by wrapping them in strong tags, so that they will stand out from the rest. But keep in mind that this shouldn't be done with CSS, but with HTML, i.e. they should not be tagged with font-weight: bold; but rather with <b> or even better, with <strong>.

Examples:
For those who like good quality images, Nikon D7000s is a 16.2 megapixel digital camera that takes excellent pictures.
The result seems to be the same, but it is not. Although these three keywords are in bold, only one is more attractive to robots, which is the first:
For those who like <strong>good quality images</strong>, <b>Nikon D7000s</b> is a 16.2 megapixel <span style="font-weight: bold;">digital camera</span> that takes excellent pictures.
The same goes for the italics. Use them for highlighting important words, but don't place them between font-style: italic; but rather between <i> or even better <em>.
For those who like <strong>good quality images</strong>, <em>Nikon D7000s</em> is a 16.2 megapixel <span style="font-style: italic;">digital camera</span> that takes excellent pictures.
Again, the first one has a better chance of ranking than the others. Thus, it is recommended to highlight the keywords in bold and italics, or to put them between <strong> and </strong>, or between <em> and </em>.

Using External Links

Some may say that we shouldn't use links in the posts because this way we are giving away our Page Rank. This is not quite true. Using referral links to sites that have already shaped their credibility, will also help us to shape our own. Certainly, we should not flood our posts with links, but we can do it when is needed and especially with sites that talk about the same topics as our own.

Another important thing to mention is that, we should avoid putting the typical "click here" or similar texts. When you put a link, the anchor text should be fairly descriptive.

Examples:
<a href="Link URL">Click here</a> to know more
More information about <a href="Link URL">digital cameras</a>
In the first example, the anchor text is not relevant and descriptive, but in the second it is.

Rank with your images

Posts with images are not only visually appealing, but might help the reader to understand what you are talking about. So, whenever you can, use an image in your post to illustrate the writing, but don't overdo it. Many images or very large images can slow the loading time of the blog.

New and relevant content

You should focus not only on writing many posts, but also making them relevant to your readers. New and original content is more attractive to the search engines, than a copy & paste (actually, the last gets penalized). So try to write new stuff, even if you think that all has been said. Each person has a different way of saying things.

Also, always get informed before writing a post. Do a research and see if the information is valid; based on that, you will gain the trust of your readers.

Final Words


With these few techniques you can increase the chances of ranking your posts higher in search engines. As I mentioned earlier, these aren't things that no one heard about, but I know that many are beginners and may not know how to write seo optimized blog posts.

It does not hurt repeating that the results won't appear overnight, but with some effort and patience, you should see the desired results over time.
Share:

Popular Posts

Con la tecnología de Blogger.